Showing posts with label holiday. Show all posts

Sunday, February 12, 2012

Easy DIY Paper Flower Valentine's Necklace? Yes, Please!

I'm I big fan of paper flower making {here's a number of books that are great resources!}. I've been dabbling in it for the last fifteen years or so (I know you're impressed, but remember the Chinese have apparently been doing it for two thousand years, and the Mexicans have been making them with gusto for centuries....) For Valentine's this year I thought I'd get crafty and make myself a snazzy paper flower pendent. If you're interested in creating something similar, here's my how to:
The finished product!
What you'll need: 
sturdy and beautiful magazine pages 
or pages of old books
needle
thread
scissors
a metal necklace chain or embroidery floss/string


1. Decide the size of your flower, and cut four large petals {as with all things in nature, variation in flowers is the norm, so there's no need to be obsessively precise}. 
2. Cut three smaller petals 
3. Over lay large petals so they touch in center, sew securely together {don't worry about stitches being perfect. But since you are sewing on paper, try not to put the stitches too close so as not to rip the paper}. 


4. Roll the smaller petals into loose cones, and sew each, one at a time, into center of flower. 


5. Lay out necklace chain, or string/ embroidery floss you have cut to size, and place flower where you would like it to lay. 


6. Sew flower to necklace. 
7. Sew bead to center for finishing touch. 
8. Go have dinner with your sweet heart! 


* Marcie

Monday, December 5, 2011

Tis the Season to CHILL OUT(!) and Escape the Vortex of Materialism!

Lake George, New York as seen through my parents' window. 

   With out a doubt Christmas time is my favorite time of year. I love the snow, the lights, the cheer, the decorations, the time with family, the time for God, and the time for reflection. And I admit I have loved the presents…. preeeessssents… so many preeeessssents….. As a child the excitement of waiting for Santa and seeing what he brought me was probably the very best thing about Christmas.  Seeing as I was just a wee babe, this is understandable, but it’s also a tad pretty depressing.
    Sure, giving gifts is a sign of love, and it’s wonderful to recieive these gifts and to feel special. But why do we need to many gifts to feel good? Why such expensive gifts to feel special? When did we develop this sense of entitlement? How on earth did a gift-giving traditon, which was indended to honor the Magi presenting presents  to the poor and underprivileged baby Jesus, morph into this vortex of materialism? I mean sure, the little guy received some pretty snazzy gifts- gold, frankincense, myrrh- but you know his mommy probably had to sell them so the family could have food….
     Whether you celebrate Christmas as a religious remembrance or as a more general family holiday, I think it’s time we all reined ourselves in a little. Let’s hold our horses and take some steps out of the destructive path of insatiable consumerism. Let’s stretch ourselves through showing constraint. Let’s appreciate the little things, the acts of kindness, the acts of charity. Let’s spend less and have it mean more. Let’s resist the urge to give something, anything {like inexpensive sweatshop crap or overpriced indulgences} to absolutely everyone we know just become that’s what’s done this time of year. 
     Let’s realize it’s not a contest, but an opportunity – an opportunity to teach ourselves and our kids the virtues of giving to those who need it. It's an opportunity to demonstrate how to graciously receiving what we’re given. It’s an opportunity to direct our gifts to those who really need them and to celebrate love more while spending money less.
   This holiday season Kia and I will be posting fun low-key gifts, jolly party ideas, festive local shops, fair-trade options, and links to meaningful charities.  We hope you have fun, enjoy the process, and find ways to help others through your purchases and time. Remember, there is nothing historic, helpful, or holly jolly about going into debt for the sake of celebrating Christmas! Quite the opposite! 

Thursday, November 3, 2011

Halloween Costumes: Not just what you know but who you know!

Charlotte and Ella, sailing the high seas of fashion! 
Sometimes for truly awesome Halloween costumes a mix and match of old, new, store bought, hand-me-down, and home-made is the best approach! As evidence of this, I turn to my friend, Jena, and her two little girls. This Halloween Jena went on a veritable treasure hunt to find just the right pieces so Charlotte and Ella could fly the skull and cross bones with pride. Here's Jena's map to pure Halloween gold! Many thanks to Jena and the girls! 
                         *Marcie 
Jena: 
Looking for the ocean! My sweet girls love to Reuse and Recycle, and that's why we love Halloween! There are so many ways to creatively use things you already have. The octopus is an amazing hand me down from a cousin, which I've been holding onto ever since Charlotte was a baby. And it was the perfect fit for Ella when Charlotte decided to forgo the princess route and become a tough pirate! Her pirate costume is a compilation of scraps that my Aunt and Grandmother had laying with the sewing. I also found an old jacket pattern from Easters past! With five dollars for the jacket fabric and one dollar for the hat at the dollar store, we say Jack Sparrow, eat your heart out!!!!


Wednesday, November 2, 2011

Halloween Party Time!

Robot Ben H. proud winner of the night's costume contest
The other week friends of ours, Jenn and Dominic, hosted a Halloween party, complete with costumes, tasty treats, mauled cider, and a trip to the State Penitentiary. Now, as I do love Halloween, but do not enjoy being frightened I had no plans on joining the party into the bowels of the prison. Ah, but things seldom go as planned {but more on that later…}

Jenn, the hostess with the mostest
Earlier in the week I acquired an 80’s jazzy jazz witch top at Past and Present in Mount Airy, which I coupled with black stretchy pants, a classic witch hat, and a wee little broom.  Jenn was keeping her costume a surprise. And when my boyfriend, Ben (who wore IN-Security guard jacket of his own creation ;) arrived at the fete, we discovered Jenn had created a cute and appropriately creepy baby-doll persona. 
Dominic's so scary, I want my mummy!


Her dress was a carefully chosen secondhand little number. Her boyfriend Dominic donned a homemade mummy costume, constructed out of long-johns and ripped cloth. 


Jake's Lederhosen made with love, by Grams!
I was quite fond of the costume worn by Jake,an absolutely lovely lederhosen sewn decades ago by his grandmother. Apparently it was not leather, but one of the first pleather incarnations! Hats off to Grandma because anyone who sews knows what a pain working in pleathure can be!


PCOM partygoers! 
Naturally this party had a costume contest, which brings me to the most creative costume of all, the robot by Ben H {pictured at top}. Inspired by LCD Sound System’s video for Home (video is great, but not suitable for young kids), Ben constructed this costume from cardboard, venting, duct-tape, and silver spray-paint. It was an industrial masterpiece, in which he managed to do everything, from dancing to traversing the haunted halls of the Penitentiary.  The only thing he couldn’t do was sit….
dance dance party party

 By the time I took the picture at the top the haunted halls had taken their toll, and  our robot friend showed some signs of wear and tare. But, as you can see even in this condition, R2D2 and Johnny Five would still be proud! Both at the party and in the prison Robot Ben, seen to your right -------->
busting a move, was quite the hit! 


Then this party moved our costumed behinds to the Penitentiary... {more to come...}


Mr. "In-Security" and I


                 *Marcie 

Tuesday, November 1, 2011

Halloween is a time to shine for moms with BA's in ART!

Charlie as Boba Fett and Lucy as an Elmo Princess, 2011


Kristen, Charlie, and Lucy 2010
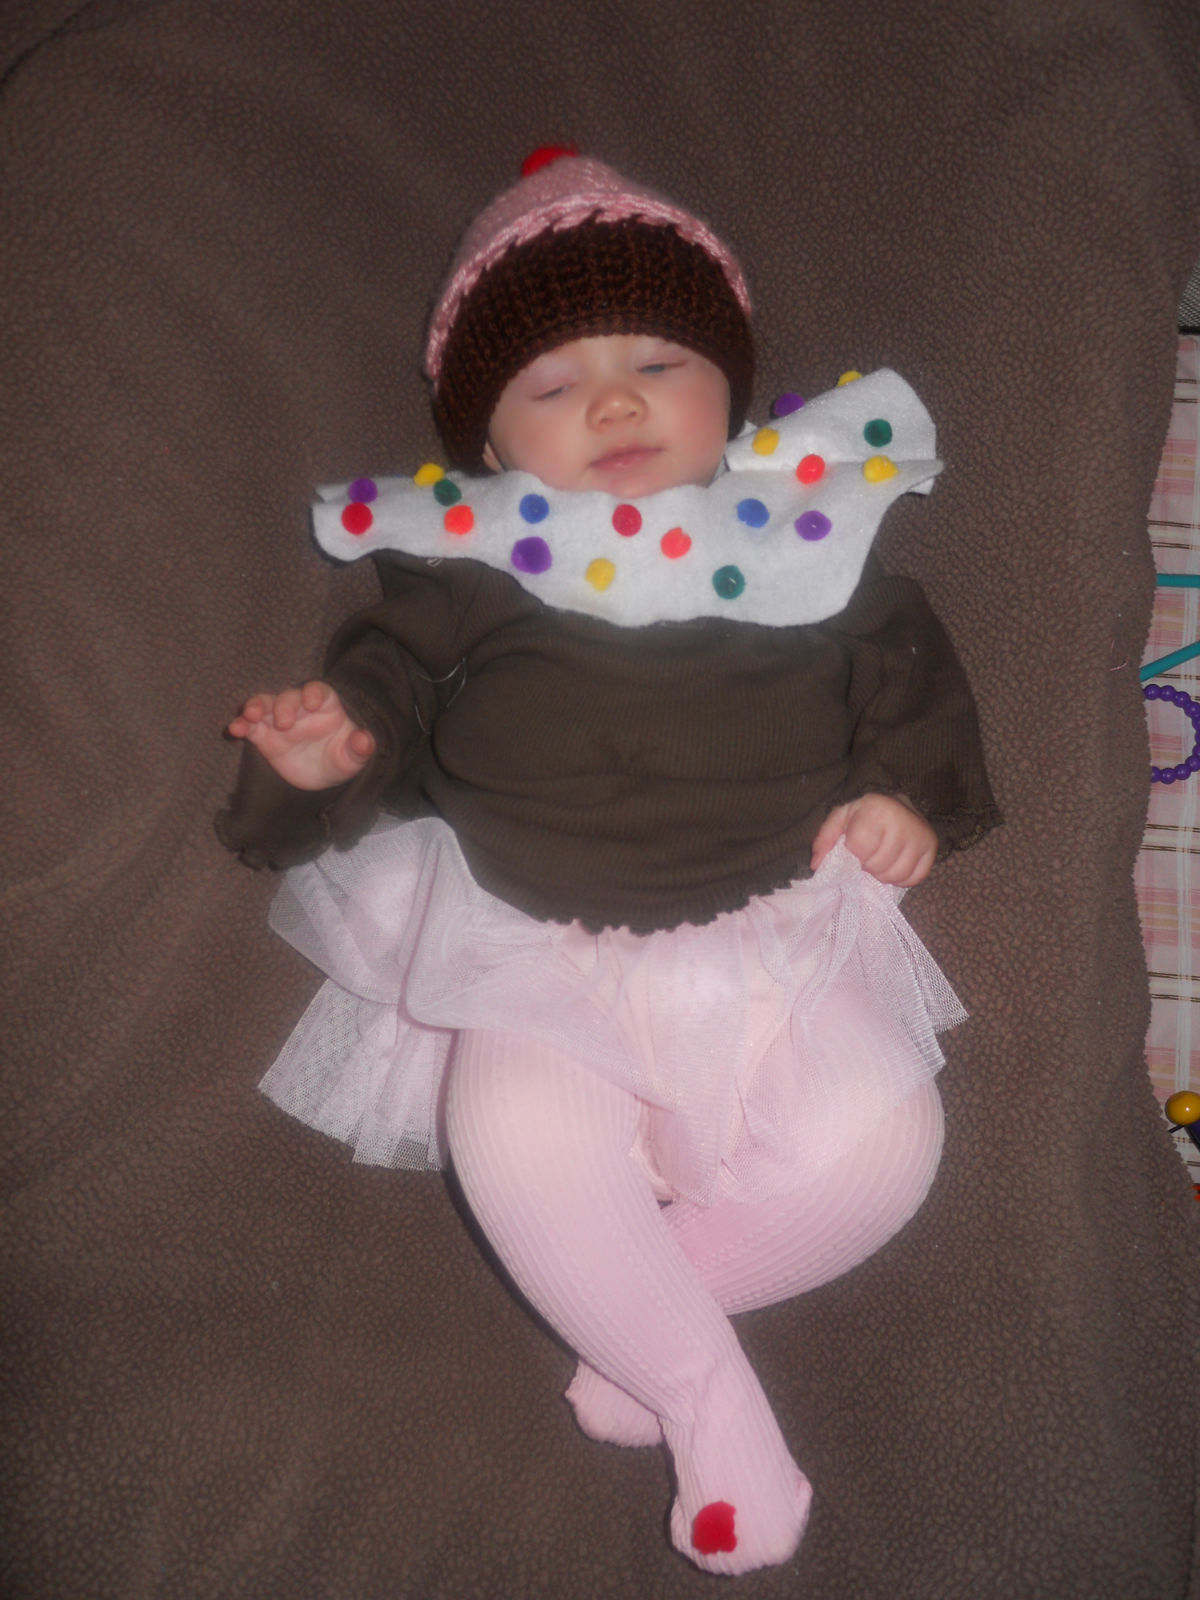
Halloween is over, but I still want to showcase some of my favorite costumes from this year {I've tucked away a few for next years entries, too}. So, you don't need an art degree to create costumes like this, but it helps! Once you take a look at the adorable costumes made by my friend Kristen, I think you'll agree! Back in College Kristen and I took a wearable art class, where the human body became the "canvas" and fabric, the "paint." 


Charlie, as Thomas the Tank Engine, 2008
When I saw the quality and variety of the costumes Kristen made for her children, Charlie and Lucy, my mind went back to our times scouring the campus for unusual materials and bursts of inspiration {of course, back then our projects were more avant garde}. Take a look at these outfits, all, save for Batman, made by Kristen. Let them help inspire you for next year! Thank you, Kristen, and enjoy!


Charlie as the family dog,  Breezer, 2007
Lucy as a cupcake, 2010


                                                                                         *Marcie


Sunday, October 30, 2011

No Toddlers in Tiaras here! A Sweet Dorothy Costume!

Photography by Caitlin Domanico, LLC

"There's no place..." you can turn without hearing or seeing discussions about how inappropriately sexy or violent children's costumes are becoming.  With the help of trusted adults children have to learn to find a safe and secure place for themselves in a society that often exploits. However, I think many of us inadvertently push children into this world, which is way more grown up than they can handle, because we think they look "cute" or "funny" posing as "sexy" or "macho" little adults. 
    That's one of the reasons I really like my friend Caitlin's "Dorothy" costume her lovely and spunky daughter, Ava. Little Ava looks sweet, adorable, and not too dolled up or grown up :) She's comfortable, classic, and herself. In being Dorothy from The Wizard of Oz, Ava is embodying a young girl who had an amazing adventure; who was brave, strong, intelligent, and caring. If your interested in seeing more costumes based on extraordinary women in literature, art, history, and science, check out the website Take Back Halloween. You'll see great costumes and learn about incredible women! 

Also, you still have a few hours to enter Caitlin's Halloween costume contest!  Caitlin Domanico was recently voted Philly's best children's photographer. Check out www.caitlindomanico.com and enter this contest ASAP!!!!!!  


                            *Marcie 

Saturday, October 29, 2011

Second-Hand Costumes for Kids, Lookin' Anything But Shabby!

Winnie the Pooh, Tigger, and the Bee, too(!)  having fun at the "Pooh Tree" of Peace Valley Park 

As I’ve said, I’m very proud to have such a multitude of creative friends. For this post I give my thanks to one of my best high school girlfriends, Mary. She's allowed me to showcase her talent for saving the big bucks as she turns her kids into big bears {and bees, and tigers!}
       Mary is a true thrift store maven.  When her gang of little men decided they wanted to be characters from Winnie the Pooh this Halloween, she packed the kids in the car in search of great deals to make her guys fit for Hundred Acre Woods. Her oldest found an adorable Pooh costume, complete with a big ole honey belly, at the Salvation Army for a very agreeable $13. Her youngest also scored big with a bumblebee costume for $8 dollars. I like how Mary felt free to branch out from the original Pooh characters, but still found a costume that was related to the Pooh theme!
Her biggest Halloween score came from the Care and Share Thrift Shop in Souderton Pa. Now this particular thrift shop was an absolute favorite of my group of girlfriends, Mary, Bethany, Hannah, and my sister, Tegan.  With five shops in one complex, this thrift-store has tons of choices and excellent prices, and all the proceeds to help fund the very worthy projects of the Mennonite Central Committee!  For one dollar Mary’s middlest little man got himself a totally awesome tiger costume. Together, Mary's band of merry men make the cutest Pooh Bear, Tigger, and Honey Bee I’ve ever seen! 

              *Marcie 

Wednesday, October 26, 2011

Make Your Own {Ent} Mask!

I am lucky some extremely creative friends.  One day while perusing facebook I noticed Steve  Colon, a really great guy I went to college with, had constructed a really great mask for Halloween! Any Lord of the Rings fans out there? Well, you’ll be excited because this mask is of an  Ent {from Anglo-Saxon for "Giant"}, which is the name Tolkien gave for his tree people in the Lord of the Rings saga.
      Even if you’re not into Lord of the Rings, you’ll be into this mask because it’s just plain awesome! Steve very graciously provided me with instructions and pictures so anyone who’s interested can make their own. So if you’d like to break away from the pack this Halloween and impress party-goers or little trick-or-treaters, there’s still time for you to follow Steve’s lead and make an Ent mask of your own. This is also great if you’re involved in theatrical productions and want to create a fantasy mask. Thank you again, Steve!   
   
                         *Marcie


Instructions in Steve's words:


You will need: Corrugated cardboard, Gorilla glue, scissors, box cutters, a paint brush, pencils, an eraser, clothespins, masking tape, a 6" protractor, acrylic paints (red, blue, yellow, black, and white or you can buy more specific colors if you aren't confident in your mixing abilities), and a palate/something to mix paint on. Other helpful items you may want: Paper towels, a bowl of water (to clean the brush between colors and to help affix the gorilla glue), and something to put under your project like newspaper or parchment and a cutting board.

Step 1: Trace outside of the protractor with your pencil.
Step 2: Mark approximately every 10 degrees and draw a 1" line from the outside of the protractor.
Step 3: Connect the tips of these lines with your pencil.
Step 4: Invert the protractor, line up the ruler side with the bottom of your semi-circle. Trace the interior of the protractor.
Step 5: Draw a line from either side of larger semi-circle to the outside of the smaller semi-circle as pictured. Draw a 1" line from where this line touches the small semi-circle and connect it to the other outside lines as shown.
Step 6: Draw the eyes. You can make these as large or as small as you like, but remember to leave about .5" in the middle. Anything more and it will be very difficult to see out of. You can draw these free-hand or by using a cup to make perfect circles.


Step 7: Draw the nose. The center line should be about 2" long. From the bottom of this line, draw a 1" line going slightly upwards on either side. Draw converging lines on the outside of the nose, connecting all three lines. Erase the top .5" of the three lines. 
Step 8: Cut out the mask using scissors.
Step 9: Cut out the eyes and nose using the box cutter. You may want to shave off little bits around the nose to make it more comfortable to wear as I have done in this picture. Try it on and see what parts feel like they are pressing and carefully remove small slivers until it is comfortable. Remember not to remove the inner pieces of the nose entirely.
Step 10: Cut small, acute triangles from the lines on the top of the mask. Be careful not to cut too far into the forehead.
Step 11: Fold the flaps back.
Step 12: Tape the flaps together using the masking tape. This is what it should look like when you are done taping the flaps.
Step 13: Securely tape the nose into place. I suggest wearing the mask while applying tape to the outside of the mask to prevent making the nose too small. (Kind of like applying a breath rite strip.)Make sure to tape both the inside and outside of the nose, securing the tape by wrapping tape through the eye holes as pictured.

Step 14: Cut out a mustache. It can be as long or as short as you like. It shouldn't be too symmetrical. You can use either the scissors or the box cutter to do this.
Step 15: Cut out eyebrows. Again, don't make them too symmetrical.
Step 16: cut out the "crown". This part should look like random tree branches and should fit approximately to the forehead of the mask. You can make it out of one piece, or several layered pieces as I am doing here.
Step 17: Cut out the beard and the lower lip. You may want to line it up with the bottom of the mask to make sure it fits fairly well. See what I mean? Also, you can cut the square edges off the bottom of the mask if you like. This is purely an aesthetic choice on your part.
Here is what the mask looks like without paint.
Step 18: Mix your paints. If you are using primaries, mix red, yellow, and black to make whatever shade of brown you like. Make sure to make enough to cover the entire mask. Once you have the color you're looking for, add a little black to some and a little white to a different part to give yourself three separate shades of brown. You'll also want to mix two shades of grey, a dark green (blue and yellow with a bit of black), a light green (same as previous without the black) white, and black.
 Step 19: Paint the mask and the crown the "middle" shade of brown.
 Step 20: Paint the facial hair the dark shade of brown. Paint the lower lip the light shade of brown. using the dark and the light shades of brown, add shading and texture to the branches.
Generally I like to put the dark side on the lower parts of the branch and the light on top. You should also add speckles and spots to make it look something like bark.
Step 23: Using the dark and light green, add vines or moss to the branches.
Step 24: Repeat the process on the mask itself. You don't need to be as concerned with detail here as much of this will be covered over with other parts of the mask.
Step 25: Layer shades of brown, grey, green, as well as small bits of black onto the facial hair in a rough approximation of hair.
Step 26: Paint the lower lip like so, using light brown and grey. Outline it with white.

Step 27: Once the facial hair is dry, outline each piece with white paint.
Step 28: Apply Gorilla glue to each piece you want to attach to the mask and dampen the adjacent piece with water. Make sure to spread the glue in a thin layer over the part you want to stick. This allows for even adhesion and prevents over expansion of the glue. If the glue expands noticeably, you can always scrape off the foam while it is still fresh with relative ease.
Step 28 con't: Use clothespins to secure each piece until the glue expands and hardens.Repeat as necessary, applying the branches to each other, the eyebrows to the base of the crown.
Attaching the lower lip to the beard...The moustace just under the nose...
And Finally the beard to the crown and beard to the mask.
Give each connection an hour to dry, or half an hour if you are using fast setting gorilla glue (recommended.) At this point you can punch holes on the sides of the face, attach a rubber band and wear as you storm Isengard!


Wednesday, October 19, 2011

HaLLoOWeEN!!!! WhAt HavE YOu WOrn?!

Hillary{the watermelon}, Jessica {the fortune teller}, and Andrea and Kelly {the scarecrows}
  Well my friends, Halloween is closing in on us faster than the headless horseman upon the Sleepy Hallow Bridge {be warned, this is not the first cheesy or cliche reference in this post}. Fear not, at least aspect of this season of spooky merriment doesn't have to have you shaking in your boots ~ figuring out your costumes! This should be fun and easy breezy, people! Alas, like so many things in today's society Halloween costume choosing and execution can be extremely competitive, stressful, or even worse, just plain boring.
   But, it doesn't have to be that way! There are so many great options, from classic costumes to eccentric ensembles! Young and old can find great get-ups from thrift stores and vintage shops, from friends, and from your own imagination! The next few weeks Kia and I will be posting pics of awesome Halloween costumes from Halloweens past and present, and we're asking you to send in pictures of your best costumes! I'm proud to post the first submitted picture!
   This family is made-up of four exuberant and creative gals, Hillary, Jessica, Andrea, and Kelly {as pictured above}, and is headed by an awesome Ma and Pa. Ma, Diana, loves Halloween, and loved putting together costumes when her girls were little! "That was a banner Halloween year! The scarecrow outfits and the watermelon slice were homemade costumes that were given to me by friends. Jessica was a 'gypsy' or to be more PC, a 'fortune teller'...she was wearing my skirt, a blouse she had, I bought a length of lace fabric that was on clearance for her shawl, and a scarf for her head. The makeup was bought from McCrory's {a five and dime}. We never bought a costume, we always made our costumes or got costumes passed on to us. It was fun making costumes out of seemingly nothing!!!" So get inspired my friends, and show us what you got!

                        *Marcie 

Monday, May 9, 2011

Happy Belated Mother's day

Happy mother’s day, mom


Vintage momma
My mother is in the middle wearing the shift dress and turtle neck
  
It’s Kia the “Princess of lateness”. I did tell you yesterday in person but I would like to say it in Blog world as well. I love you mommy so much. You are my most favorite person in the world , ( Okay it's actually a tie between you and Maya B.).
You are the Bees Knees, I love you sooooo much.


Vintage Momma
 

Sunday, May 8, 2011

Mothers Day Marcie Style


My mother, Patti, looking adorable in Lake George, NY!  
When it comes to special occasions, I often have good intentions thwarted by a poor memory. Were it not for my teachers in elementary school providing me with paper and crayons or pressing my little hand into clay, Patti would have had years of disappointment. Loved though she is, she's probably not going to get a birthday, anniversary, or Mothers Day card from her middle child. But, she knows I love her to bits, and here I am declaring it to the world :) This picture of "Sweet Sweet Patti," as my high-school friends dubbed her, was taken at Prospect Mountain Lake George, NY sometime in the late 1960's. Mommy will know the exact year, and I shall ask her later.


Marjorie Bulow,  somewhere in Schenectady, NY
I have also included pics of my mom's mom, Marjo (or Marge) and my dad's mom, Ardis. My usually sharp detective skills are telling me from the picture quality and clothing style they are both from around the late 1930's to early 1940's. My mommy will also know these dates. She knows it all. *Marcie 

 
Ardis Murray, presumably in Ballston Spa, NY